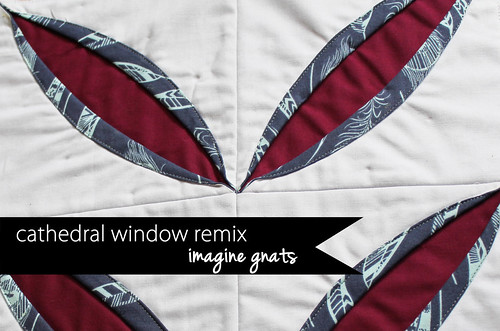
today, i'm sharing with you the free tutorial for my cathedral window remix block! now, i must confess that i've never actually made a "proper" cathedral window block (it's on my to-do list, i promise!), so i was a little uncertain on where to start with this block. but then i remembered these orange peel-inspired pillows from Jacquie of Tallgrass Prairie Studio and knew i had to find a way to construct a similar square using the fabric folding techniques of traditional cathedral window blocks.
i hope you enjoy making this block as much as i did! you can download the instructions in pdf form from Pellon Projects, and visit Free Quilt Patterns for more information about the other cathedral window free tutorials in this series.
![cathedral windows QAL]()
Materials required: ¼ yard or fat quarter each of three fabrics (example uses white, print, and solid)
Cut fabric:
7.25” squares (4 each) of white and print
6.5” squares (4) of solid
![cathedral windows QAL]()
Construct blocks:
1. Mark diagonal line on each of the 4 white squares
![cathedral windows QAL]()
2. Place white and print squares right sides together and pin
3. Stitch ¼” on both sides of marked line for each set of squares (as shown in diagram A)
4. Cut each square in half on drawn line
5. Press seams open
6. Fold each triangle wrong sides together and press (note: fold just to the side of seam so that print shows on the white side, but no white shows on the print side)
7. Trim each triangle so that raw edges are 6.5”
8. Place two triangles on each solid square (white side facing up), matching raw edges, and pin
![cathedral windows QAL]()
9. Baste each square 1/8” around raw edges
10. Lay out squares and stitch together with a ¼” seam allowance
![cathedral windows QAL]()
Form curves:
11. In the center of each of the four blocks, fold edge of triangle ½” towards corner (exposing print) and pin
![cathedral windows QAL]()
12. Form curve by rolling over entire edge of triangle and easing so that curve ends ¼” from sewn corners (or ½” from raw edge corners) and pin
![cathedral windows QAL]()
13. Topstitch close to outside edge of curve (through all thicknesses), backstitching at beginning and end
![cathedral windows QAL]()
Done!
![cathedral windows QAL]()
make sure to share pics of your blocks in the Flickr group for your chance to enter the giveaways! you can find more info about the cathedral windows qal schedule and prizes from Pellon here.
![]()
happy stitching!
![]()
![]()
i hope you enjoy making this block as much as i did! you can download the instructions in pdf form from Pellon Projects, and visit Free Quilt Patterns for more information about the other cathedral window free tutorials in this series.
Materials required: ¼ yard or fat quarter each of three fabrics (example uses white, print, and solid)
Cut fabric:
7.25” squares (4 each) of white and print
6.5” squares (4) of solid

Construct blocks:
1. Mark diagonal line on each of the 4 white squares

2. Place white and print squares right sides together and pin
3. Stitch ¼” on both sides of marked line for each set of squares (as shown in diagram A)
4. Cut each square in half on drawn line
5. Press seams open
6. Fold each triangle wrong sides together and press (note: fold just to the side of seam so that print shows on the white side, but no white shows on the print side)
7. Trim each triangle so that raw edges are 6.5”
8. Place two triangles on each solid square (white side facing up), matching raw edges, and pin

9. Baste each square 1/8” around raw edges
10. Lay out squares and stitch together with a ¼” seam allowance

Form curves:
11. In the center of each of the four blocks, fold edge of triangle ½” towards corner (exposing print) and pin

12. Form curve by rolling over entire edge of triangle and easing so that curve ends ¼” from sewn corners (or ½” from raw edge corners) and pin

13. Topstitch close to outside edge of curve (through all thicknesses), backstitching at beginning and end

Done!
make sure to share pics of your blocks in the Flickr group for your chance to enter the giveaways! you can find more info about the cathedral windows qal schedule and prizes from Pellon here.
happy stitching!